
What are the 7 steps of autonomous maintenance?
Table of contents

Share:


Seven steps. That is what you get when you look up how to run autonomous maintenance, and it is the part that makes plant leaders quietly close the tab.
Because you are not starting from zero. You have operators who already run the machines, a maintenance team that is already stretched thin, and a downtime number somebody upstairs wants improved this quarter. Seven sequential steps, each one supposed to be embedded before the next begins, does not sound like a plan. It sounds like a project you do not have time for.
Here is what the seven steps actually are: a sequence for building operator capability before you hand over responsibility. Follow the order and operators end up genuinely owning the condition of their equipment, catching problems weeks before a technician would have. Skip ahead, which is what almost every struggling program did, and you get checklists nobody trusts, filled in by people who were never taught what they are looking at.
The steps are not the hard part. Knowing what each one actually requires, and what breaks downstream when you rush it, is the hard part.
So that is what this article covers. We walk through all seven steps in order, what each one demands of your operators and your maintenance team, where programs most often go off the rails, and how to implement them without taking on the whole plant at once.
What is Autonomous Maintenance?
Autonomous maintenance (AM) moves basic equipment care (cleaning, inspection and lubrication) to the operators who run the machines, so technicians have time for planned maintenance, root cause analysis and the repairs that need their skills.

AM is one of the core pillars of Total Productive Maintenance (TPM), and it also sits inside World Class Manufacturing (WCM). It comes first for a practical reason. It gives the maintenance team the two things every other pillar depends on: time and data. Operators handle the routine checks, and what they record shows maintenance where equipment is starting to drift.
The bigger change is ownership. An operator who cleans and inspects the same filler every shift starts to treat its condition as part of the job. Production and maintenance stop arguing about whose problem the leak is.
There are 7 steps to activating an AM program. They are incremental by design: each one builds operator skill before the next hands over more responsibility, until operators run routine care on their own.
Operators
Frequent, low-risk, easy to standardize
- Cleaning and visual checks
- Lubricating approved points
- Tightening approved fasteners
- Checking gauges and fill levels
- Recording what they find
Maintenance technicians
Specialist skills or a formal qualification
- Diagnosis and complex repairs
- Electrical and hydraulic work
- Anything that touches a safety system
- Root cause analysis on repeat failures
- Tasks with a legal or company qualification requirement
Write the boundary down. A skills matrix records who is approved to do which task.
What Are the Benefits of Autonomous Maintenance?
- Problems get caught while they're small. Operators are at the machine every shift. With some training, they notice the new noise, the loose guard or the slow leak long before it turns into a breakdown.
- Technician hours go where they count. Routine CIL tasks come off the maintenance schedule, so technicians spend their time on planned work, repeat failures and the repairs only they can do.
- Cleaning and lubrication actually happen. When a technician is buried in a major repair, the simple jobs get skipped. AM puts them on the operator's shift standard.
- Production and maintenance work as one team. Operators report, maintenance responds, and both can see what got fixed. Less finger-pointing between departments.
- Accountability carries over. Operators who own the condition of their equipment bring the same habits to safety, quality and continuous improvement.
- Less money spent on emergencies. Reactive repairs, overtime call-ins and rush parts cost more than planned work. Every failure caught at the inspection stage is one you plan for instead.
The 7 Steps of Autonomous Maintenance at a Glance
The seven steps split into two stages. Steps 1 to 3 restore the equipment and write the standard. Steps 4 to 7 build operator skill until the team runs that standard on its own.
You'll also see the steps under different names. The original TPM wording, still common in training materials, calls them Initial Cleaning, Countermeasures for Contamination, Standardization, General Inspection, Autonomous Inspection, Organization and Orderliness, and Full Implementation. The work is the same. The table maps the names and shows what "done" looks like before you move on.
| Step | Also called | Ready for the next step when |
|---|---|---|
| 1. Initial cleaning | Initial Cleaning | Every machine on the pilot line has been deep cleaned, and each defect found is tagged and logged |
| 2. Eliminate sources of contamination | Countermeasures for Contamination | The main causes of recontamination are fixed or have an owner and a due date, and hard-to-clean areas are easier to reach |
| 3. Establish CIL standards | Standardization | Each machine has a written CIL standard: what, how, how often, who, and with which tools |
| 4. Conduct general inspections | General Inspection | Operators know how each key component works, what failure looks like, and how to inspect safely, including LOTO |
| 5. Empower autonomous inspections | Autonomous Inspection | Operators complete CILs on shift without a technician present, and supervisors review what they find |
| 6. Standardize and share best practices | Organization and Orderliness | The best-performing routine is documented and used on every shift and line |
| 7. Commit to continuous improvement | Full Implementation | Operators own routine care, and the team uses the data to adjust intervals and remove recurring causes |
Step 1: Start with Initial Cleaning
Pair a technician with a small operator team and deep clean the equipment: dust, product build-up, oil and grease, including the areas the daily clean never reaches. The goal isn't a shiny machine. Cleaning is inspection. A full clean exposes leaks, cracks, loose fittings and worn parts, and every defect found gets tagged and logged.
It also builds familiarity. Operators who have cleaned a machine down to the frame notice when something about it changes.
Where it goes wrong: plants run it as a one-off clean-up day. If the defects aren't logged and assigned, step 2 has nothing to work from.
Weever's role: Weever standardizes the cleaning protocol and schedules it, and operators log each defect with a photo as they find it. Managers see what was cleaned, when, and what turned up, without relying on anyone's memory or a paper checklist.
Step 2: Eliminate Sources of Contamination
Find and fix what makes the machine dirty again: oil leaks, product spillage, gaps in guards, and areas so hard to reach they never get cleaned properly. Cleaning only lasts if the cause is gone, and every source you remove cuts the cleaning time operators need later.
Where it goes wrong: contamination sources get noted and never fixed. Operators see the same leak every week and stop writing it down.
Weever's role: each source becomes a corrective action with an owner and a due date, with reminders until it's closed. Sources aren't just observed, they're acted on.
Step 3: Establish CIL Standards (Clean, Inspect, Lubricate)
Write down what operators clean, inspect and lubricate on each machine, how to do it, how often, and with which tools and lubricants. Start from the equipment manufacturer's specs, then adjust for your lines. These standards become your CIL forms. Without them, how well a machine is maintained depends on who is on shift that day.
Where it goes wrong: standards that try to cover everything. If a CIL can't be finished inside the shift, it gets pencil-whipped. Keep centerline points to the 5 to 20 variables that matter most, and use ECRS (eliminate, combine, reduce, simplify) to trim the rest.
Weever's role: the standard is built as a digital checklist with photos of each inspection point and the target range for each setting. Updating it takes minutes, and the change reaches every line and site at once.
Step 4: Conduct General Inspections
Train operators on how each major component works, what normal looks, sounds and feels like, and what early failure looks like: vibration, odd noises, overheating, unusual smells. Include safety, especially lockout/tagout (LOTO). Then schedule regular inspections.
Where it goes wrong: handing operators the inspection checklist before the training. They tick boxes without knowing what they're looking at. This is the step most struggling programs skipped.
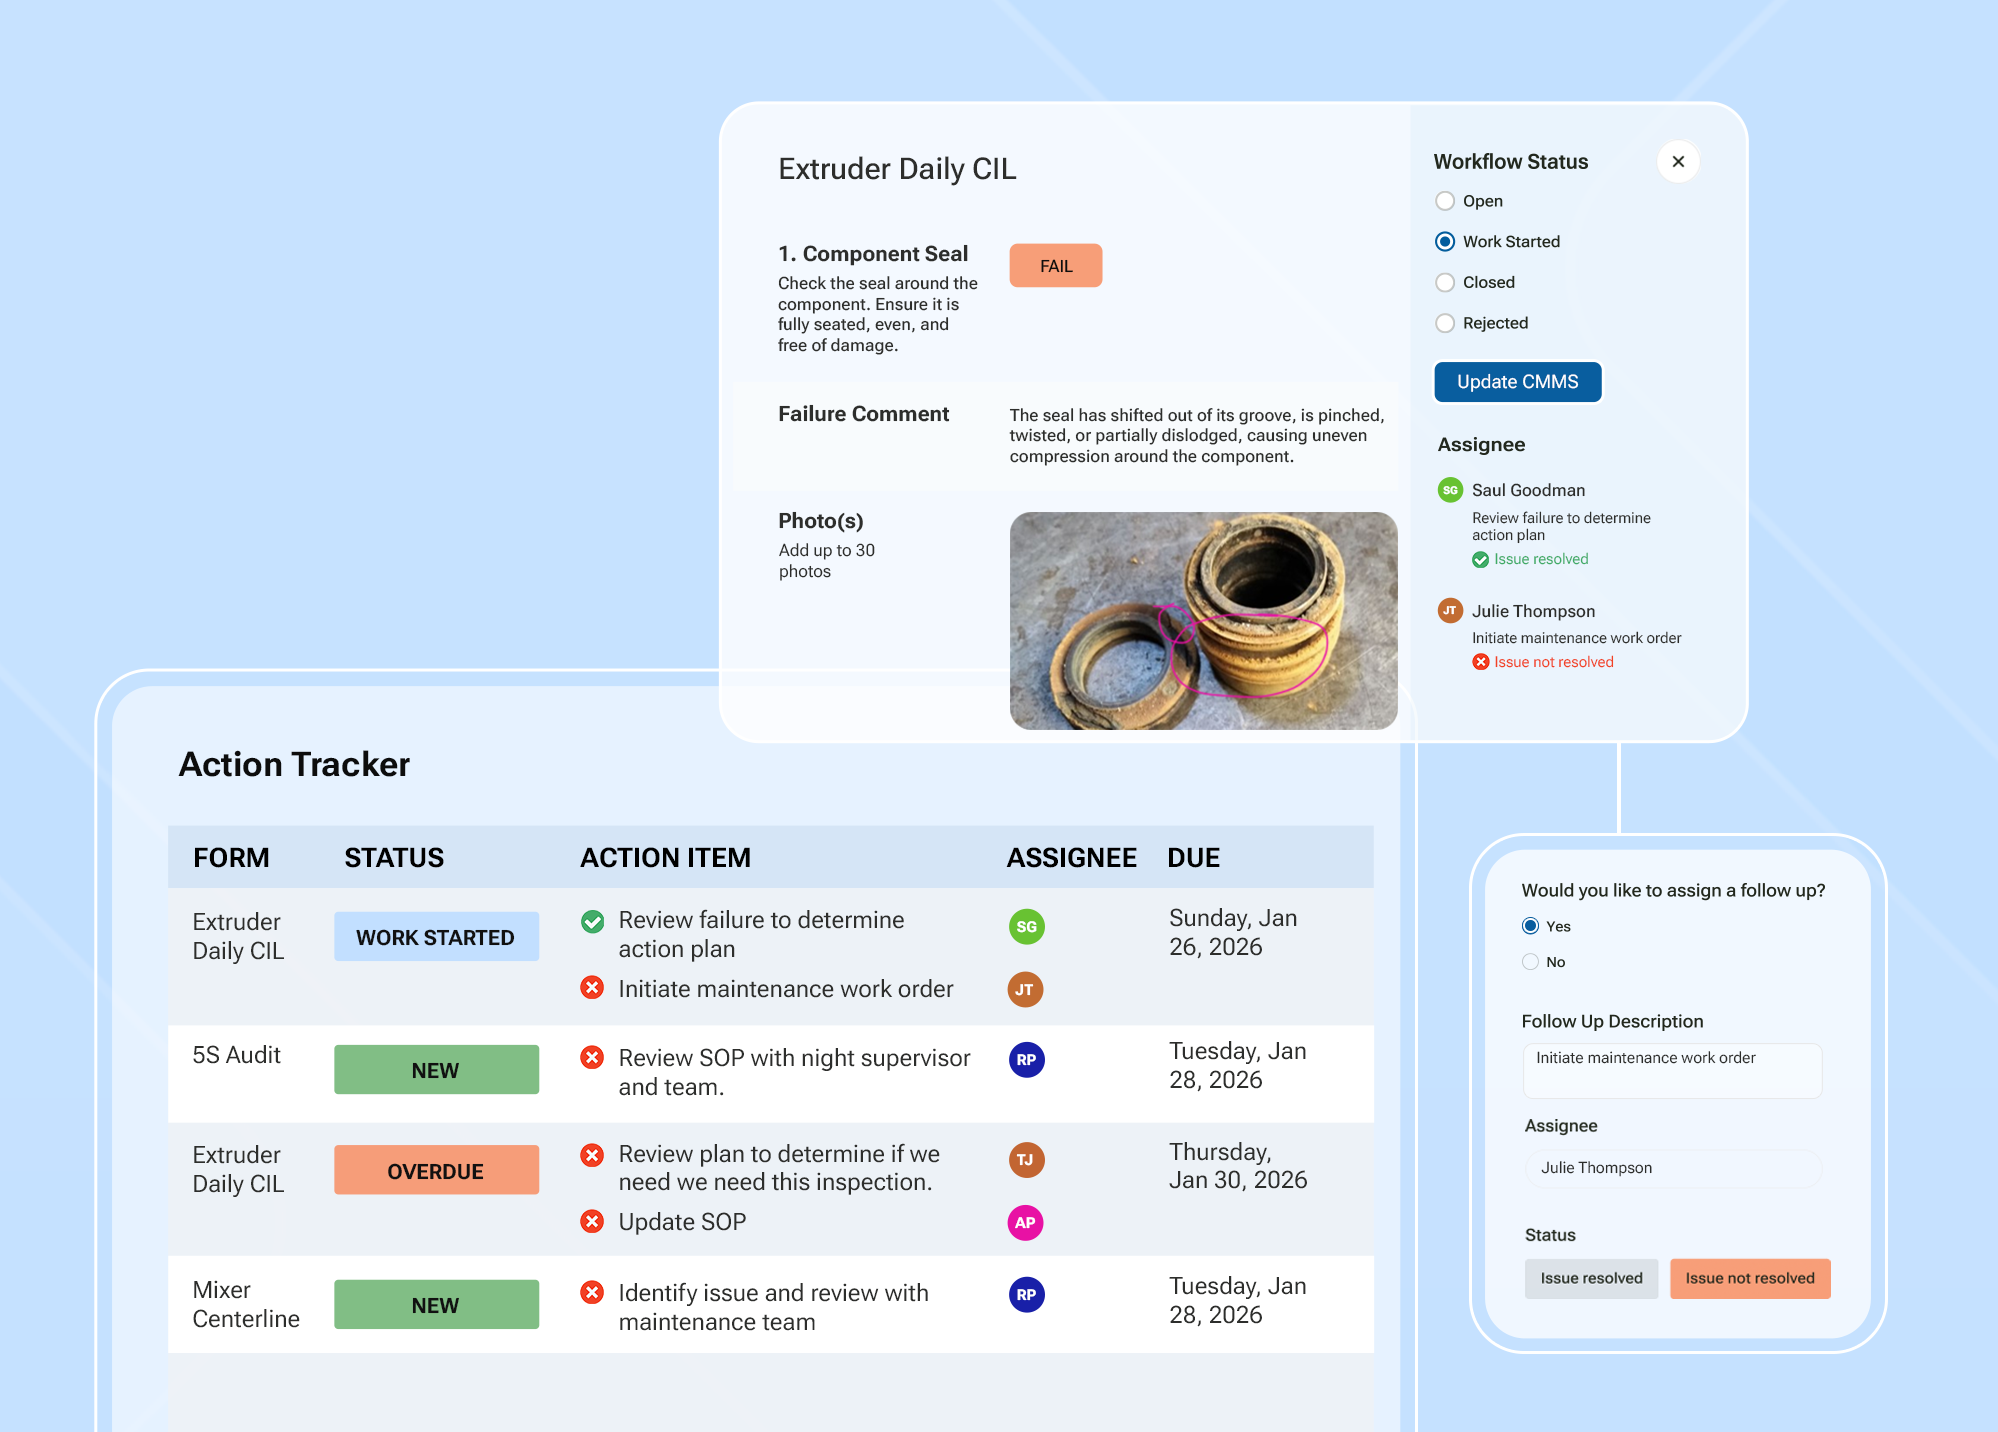
Weever's role: inspections run on a set schedule with reminders, and missed checks are flagged. When an operator finds an abnormality, it's logged with a photo, assigned and tracked to closure in the same system.
Step 5: Empower Autonomous Inspections
Operators now run the CIL standard on shift without a technician beside them, and supervisors review the results and coach. Operators are closest to the equipment. With the knowledge and the responsibility, they catch misalignment, wear and small defects before anyone else.
Where it goes wrong: reports go in and nothing comes back. If a reported abnormality isn't acted on, operators stop reporting. Maintenance has to respond, and be seen responding.
Weever's role: operators open step-by-step guides, photos and videos at the machine on a shared device, with no app to install and no login. Failed checks route to maintenance automatically, with the photo and context attached.
“The machine operators seemed to really like how easy it was to execute and submit inspections including photos and videos. I think the platform gave them some confidence and made the process more enjoyable. As a result, I didn’t have to chase after them to complete their CILs nearly as much.”
Mark, Maintenance Manager, Global CPG Manufacturer
Read the case studyStep 6: Standardize and Share Best Practices
Document every procedure, inspection and task so the best way becomes the only way, on every shift, line and site. Build the routine into shift schedules, onboarding and your skills matrix. Visual controls help here: color-coded gauges that show centerline ranges, marked inspection points, and QR codes that open the current SOP or form.
Where it goes wrong: the program lives in one person's head. When an experienced operator or the AM champion leaves, the standard leaves with them.
Weever's role: standards live in one place, version controlled, and update everywhere at once. One Point Lessons (OPLs) share what one shift learned with the rest of the plant.
Step 7: Commit to Continuous Improvement
Review completion data, abnormality trends and operator feedback, then refine. Adjust intervals, drop checks that never find anything, and use PDCA on recurring problems. When AM catches a failure before it causes downtime, share the story. Once operators fully own routine care, consider expanding their scope to minor repairs.
Where it goes wrong: data gets collected and never read. If nobody looks at which machines, shifts and inspection points generate the most failures, the checklist stays the same while the equipment changes.
Weever's role: reports by line, shift and equipment build themselves, and data can flow into Power BI. Managers see which tasks prevent downtime and which ones only add time to the shift.
The steps are a sequence, not a checklist
Every AM program that fails follows the same pattern. Someone builds the forms first and the capability second. Operators get handed a checklist for equipment nobody taught them to read, the data comes back at 100 percent, and no one in the plant believes it.
Get the order right and the payoff compounds. In an 18-month AM program at the Assela Malt Factory, breakdowns fell 46 percent [Jain, Bhatt and Soni, 2015], and the operator who once waited for maintenance becomes the person who catches the problem first.
Start with step one and one line. Not the whole plant, and not step five.
How to Implement the 7 Steps of Autonomous Maintenance
Knowing the steps is one thing. Getting them running on a live plant floor, with the crew and the budget you already have, comes down to where you start, how you train and how fast you move.
- Start with one line and one activity. Rolling out CILs, centerlines, 5S and abnormality reporting across the whole plant at once is the most common reason AM programs fail. Pick a pilot line, take it through steps 1 to 3, and expand once it's stable.
- Soft launch with a core team. A few operators, a technician and a supervisor test the forms and the routine before anyone else sees them. They become the people the rest of the floor asks.
- Build autonomous maintenance training into every step. Training isn't a kickoff session. Component basics and LOTO come before step 4, the CIL standard before step 5, and AM goes into onboarding by step 6. Short videos and photos at the machine work better than a binder, especially with high turnover or multilingual crews.
- Treat your autonomous maintenance checklist as a living document. Your CIL forms will change at every step. Plan for revisions instead of locking the first version.
- Don't rush the gates. Each step should be embedded before the next one begins. The "Ready for the next step when" column above is the check.
- Make the response visible. Track how long reported abnormalities take to close and share that number with the floor.
A global CPG manufacturer we worked with ran it exactly this way: a single pilot line and a small internal team first, then every line on site, and the plant now averages over 1,500 AM submissions a month.
Ready to put Autonomous Maintenance into practice?
Get Weever’s Ultimate Guide to Autonomous Maintenance, featuring implementation best practices, CIL and centerline workflows, and examples from food and CPG manufacturers.
Download the Autonomous Maintenance Guide (PDF)
What Does a Well-Run AM Program Save?
The case for AM is the cost of the alternative: waiting for equipment to fail.
Cost of downtime
$125,000
Average cost of one hour of unplanned downtime for a typical industrial business
How often it happens
2 in 3
Industrial businesses with unplanned outages at least once a month
After an 18-month AM program
64%
Lower overall maintenance cost
After an 18-month AM program
23%
Maintenance person-hours saved and moved into preventive maintenance planning
Sources: ABB Value of Reliability survey, 2023; Jain, Bhatt and Soni, Autonomous Maintenance: A Case Study on Assela Malt Factory, 2015.
In ABB's 2023 survey of 3,215 plant maintenance decision-makers, over two-thirds of industrial businesses reported unplanned outages at least once a month, at close to $125,000 per hour of downtime. Yet 21% still rely on run-to-fail maintenance [ABB Value of Reliability, 2023].
The Assela Malt Factory study shows what a structured AM program does on the other side of that ledger. Over 18 months, overall maintenance cost fell 64%, and maintenance teams saved 23% of their person-hours, which went back into preventive maintenance planning [Jain, Bhatt and Soni, 2015].
The paperwork has a cost too. Before digitizing, the maintenance manager at a global CPG manufacturer we worked with put it plainly: "I was spending about 30% of my day manually inputting data from paper forms and battling spreadsheets."
How Weever Helps You Run All Seven Steps
Building the first checklist is the easy part. Keeping it running across shifts, keeping it current as equipment changes, and proving it's actually being done is where paper falls apart. Weever puts CILs, centerlines, 5S and abnormality reporting on one system, with interactive instructions, pass/fail forms, automated maintenance workflows and OPLs built in.
| Item | On paper | In Weever |
|---|---|---|
| Scheduling | Printed CIL calendars and flip cards; missed checks found days later | Checks scheduled by shift, with overdue items flagged automatically |
| Instructions | Laminated SOPs and what operators remember | Photos, video, centerline ranges and OPLs inside each checklist |
| Abnormalities | Written on the sheet, often never reach maintenance | Routed to maintenance with photos and tracked to closure |
| Completion data | Typed into spreadsheets by a manager | Reports by line, shift and equipment, in real time |
| Updating a standard | Reprint and redistribute every form | Update once, live on every line and site |
Schedules that don't depend on anyone's memory
CIL and centerline checks run on daily, per-shift, weekly or monthly schedules, with reminders to operators and overdue checks flagged to supervisors. When one step is done, the next set of tasks is already scheduled. Holiday or shutdown changes take seconds, not a weekend with a spreadsheet.
Instructions at the machine
Operators see exactly what to do, when and how, with photos, video, centerline ranges and OPLs inside each checklist. Forms run on shared devices with no app to install and no login, in 11 languages. That makes autonomous maintenance training part of the shift instead of a classroom session operators forget a week later.
Abnormalities that actually reach maintenance
A failed check or an abnormality routes to the right person automatically, with photos and context attached, and can flow into your CMMS as a work order. Operators can follow each issue from submission to closure. Mars Fort Smith, a Mars site we worked with, reached an 89% abnormality close rate after moving AM onto Weever. Royal Canin's Lebanon, Tennessee factory captured nearly 3,000 abnormalities with a 95% close rate by late 2024.
Data you can act on
Completion, abnormality trends and centerline performance report by line, shift and equipment in real time, and push into Power BI. Weever Radar, the AI layer across the platform, looks across that stream of failed CILs, out-of-tolerance readings and abnormality reports to surface recurring patterns, so a small deviation gets attention before it becomes downtime.
Live in weeks, priced for the whole site
Weever's Customer Success team builds the first version of your forms and supports a soft launch on one line before full rollout. Site-wide pricing means unlimited users and no per-seat licenses, so every operator who touches the process can take part.
Closing
A paper AM checklist is a static to-do list. The seven steps turn it into a standard operators own, one that changes as your equipment and your team change. Get the order right, and every check your operators complete is one less breakdown your technicians have to chase.
Want to see what steps four through seven look like when the standards, schedules, and abnormality reports all live on one system? Book a demo and bring your current CIL form. We will show you where your program actually sits in the seven steps.
Spend Less Time on Admin. More Time Improving Operations.
See how Weever automates data entry, reporting, and action items so you can focus on improvement not admin.